
Choose an Anker power station for a 12V fridge by matching the fridge’s supported connection, your measured trip energy and the charging stops you can actually use. The current US C1000 Gen 2 offers a smaller 1,024Wh package; C2000 Gen 2 doubles nominal capacity to 2,048Wh and adds an expansion option. Both list a 12V, 10A car output, so the larger battery does not raise that socket’s current limit.
C1000 Gen 2 is a candidate when the complete trip fits its energy budget or dependable charging closes the gap. C2000 Gen 2 gives more time between charging stops if its larger footprint and weight fit your loading plan. Start with those conditions, then work through the five checks below before buying.
This comparison covers the US Gen 2 products. Wild Smart Gear has not tested their fridge runtime, charging speed or fit in a specific SUV. Earlier draft claims of measured runtimes, guaranteed vehicle fit and universal regulated-output performance lack test records.
1. Match the exact Anker power station and fridge connection
Keep the generation in the model name. A deal labeled “C1000” may refer to the original 1,056Wh product or the 1,024Wh C1000 Gen 2. Likewise, the original F2000 and C2000 Gen 2 have different equipment and manuals despite sharing a 2,048Wh capacity figure. Verify the Anker power station’s label, region and manual before comparing prices or accessories.
The following specifications come from the US C1000 Gen 2 product page and US C2000 Gen 2 product page, read on October 29, 2026. They describe the main station, without an expansion battery. Confirm the regional unit you are buying; a US AC specification does not describe a UK or Australian outlet.
| Specification | C1000 Gen 2 | C2000 Gen 2 |
|---|---|---|
| Nominal battery capacity | 1,024Wh | 2,048Wh |
| Car output | 12V, 10A, 120W | 12V, 10A |
| Continuous AC output, US | 2,000W | 2,400W |
| Maximum AC charging | 1,200W standard; 1,600W UltraFast | 1,800W |
| Maximum solar input | 600W | 800W |
| Published dimensions | 15.12 × 8.19 × 9.61in | 18.1 × 9.8 × 10.1in |
| Published main-unit weight | 24.9lb | 41.7lb / 18.9kg |
| Expansion | Not supported | Supported BP2000 Gen 2 option |
Use the car-output row for a fridge connected by its 12V cable. A 2,000W or 2,400W inverter rating applies to the AC outlets. It cannot increase the car socket’s 10A allowance, and a splitter cannot create another independent 10A supply from that socket.
Check demand while the compressor runs and starts
Read the fridge manual for permitted voltage, maximum current, required cable and any stated startup condition. Daily watt-hours describe accumulated energy; they do not establish the maximum demand on an output. A fridge that uses little energy over a day can still require a connection that a particular socket does not support.
Compare the complete arrangement: Anker power station socket, approved cable, plug and fridge input. Keep the fridge’s low-voltage settings within its instructions. If an adapter is required, include its supported voltage, polarity and current rather than selecting it by connector appearance alone. A cable that can be inserted is not sufficient documentation of compatibility.
If you intend to use the fridge’s supplied AC adapter, check that adapter and the Anker power station’s AC output separately. The adapter changes the power path and the measurement boundary. You cannot take energy measured on the fridge side of one arrangement and assume the same station-side demand for another arrangement without accounting for the change.
An original C1000 owner’s connection report illustrates a useful purchasing concern. The owner reported immediate DC shutdown with an Alpicool C20 and later said an Anker support firmware update resolved it. This is one person’s account about the original model. It does not establish a Gen 2 defect rate, a universal firmware fix or a tested compatibility list.
Its practical implication is to verify your exact fridge and station during the return period. Keep the model and firmware with the observation. A generic “runs car fridges” description leaves unanswered whether your fridge restarts on the Anker power station after an idle period and whether the complete cable works reliably.
Give older generations their own comparison
If the offer is for the original C1000, use the original C1000 fridge assessment. For an F2000 offer, use the original F2000 fridge assessment. Their specifications and accessory families stay with those models. A larger discount does not remove the need to identify which generation is in the box.
For the two Gen 2 units here, reject either candidate if the supported fridge connection is unresolved. More nominal energy helps only after the output and load can operate together. Record any manufacturer clarification with the product details so a later purchase uses the same arrangement.
2. Compare both models with the same trip energy budget
Bring a representative daily energy figure to the comparison. Measure the fridge under conditions close to the trip: target temperature, contents, ambient conditions, ventilation and lid openings. The 12V fridge power-consumption worksheet covers the measurement task. Here, the question is how the same recorded load changes the choice between two Anker models.
Include other devices in the trip total. If the fridge is measured at its DC input, use comparable load-side energy for lighting and charging in the example, and allow for station losses consistently. Do not mix AC input ratings, fridge output energy and nominal battery capacity in a single sum without identifying their boundaries.
Write trip duration in hours or full 24-hour periods. “Two nights” could mean arriving Friday evening and leaving Sunday morning, or operating for two complete days. Those schedules can consume different energy. The Anker power station also powers the fridge during daytime travel and parked stops unless another supported source takes over.
A common planning convention for this comparison
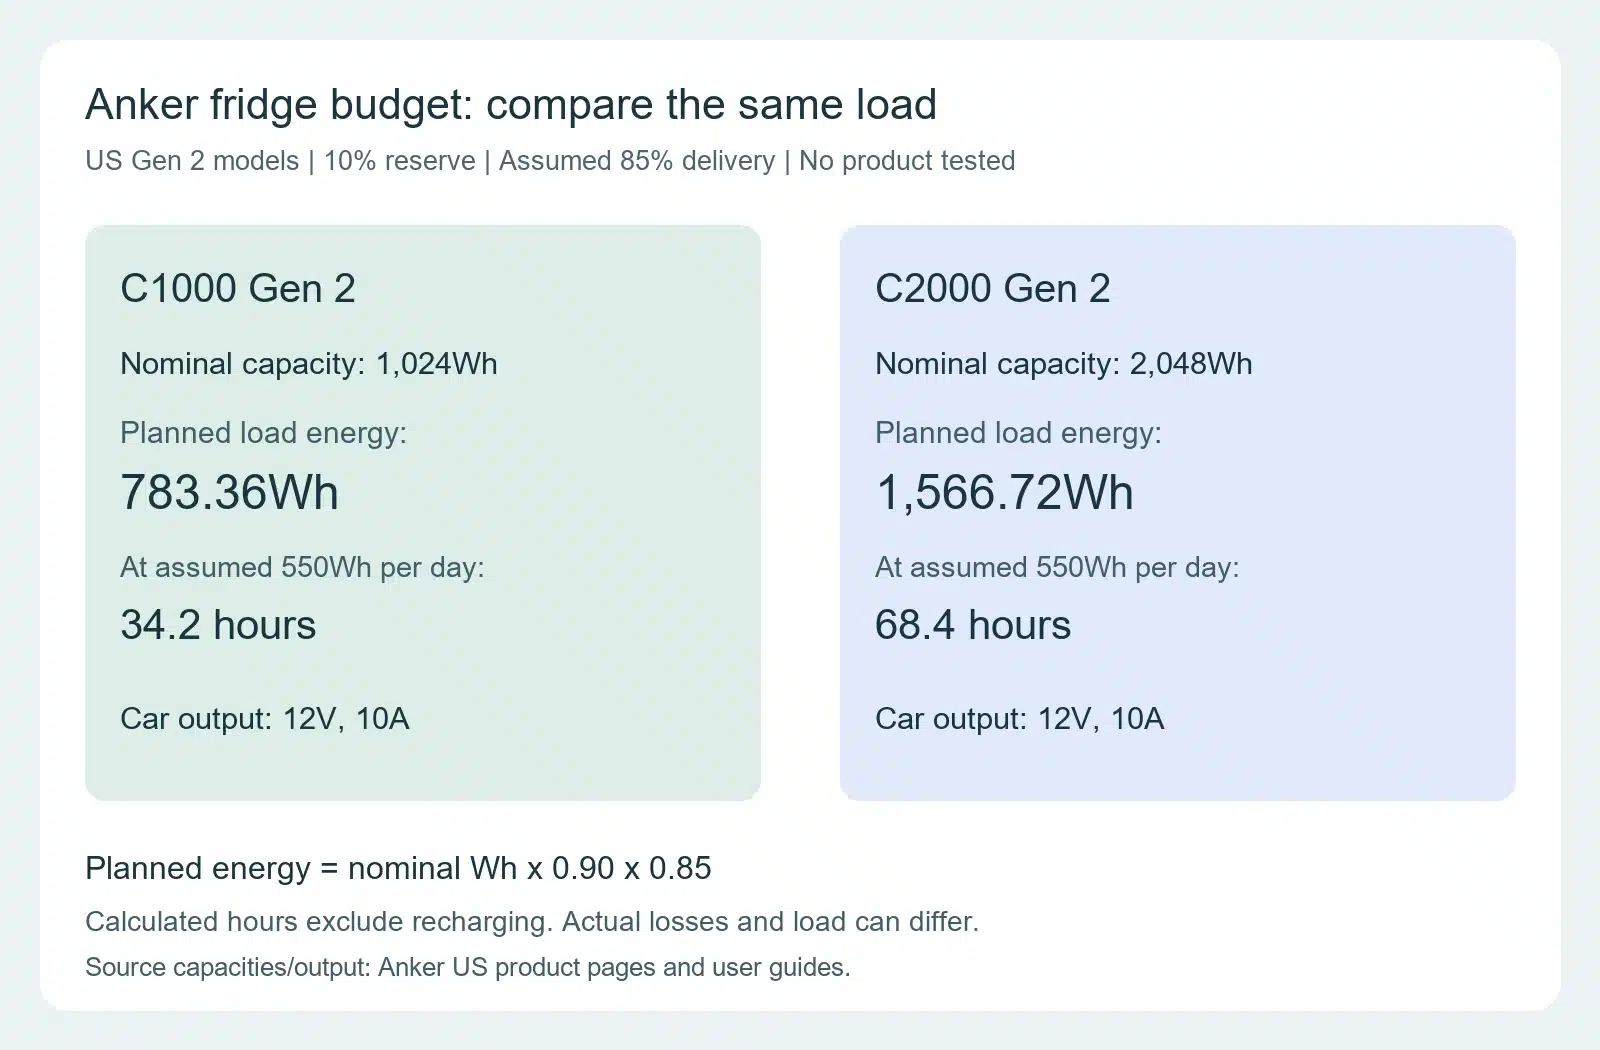
The examples assume a healthy Anker power station starting fully charged, 10% of nominal energy kept in reserve and an 85% delivery factor for the energy above that reserve. The delivery factor is an assumed allowance for conversion and operation, including standby use. It is not a measured efficiency for either Anker power station.
Under this convention:
- Planned load energy = nominal Wh × 0.90 × 0.85.
- C1000 Gen 2: 1,024 × 0.90 × 0.85 = 783.36Wh.
- C2000 Gen 2: 2,048 × 0.90 × 0.85 = 1,566.72Wh.
No separate standby allowance is added to these examples because the assumed delivery factor already includes it. If you build a more detailed model with measured standby use, revise the factors accordingly. Counting the same overhead twice would make the comparison misleading.
These figures are budgets at the loads before the chosen reserve, with no recharging. Battery condition, temperature, output settings and elapsed time can change the actual result. If the station starts below full charge, or a configured lower limit leaves more energy unavailable, recompute the budget.
What the same daily load does to the choice
For a steady average daily energy figure, calculated hours = planned load energy ÷ daily Wh × 24. The fridge runtime calculation guide explains that calculation and its limits. Use representative cumulative energy instead of multiplying compressor peak watts by an entire day.
| Assumed total load per 24 hours | C1000 Gen 2, calculated hours | C2000 Gen 2, calculated hours |
|---|---|---|
| 300Wh | 62.7 | 125.3 |
| 500Wh | 37.6 | 75.2 |
| 550Wh | 34.2 | 68.4 |
| 900Wh | 20.9 | 41.8 |
The exact two-to-one relationship follows from using double capacity and identical assumed factors. It is arithmetic, not evidence that the larger model has the same measured losses or twice the real runtime in every setup. If you obtain measured load-side energy for each unit under matching conditions, use those observations instead.
Suppose the fridge consumes 500Wh per day and lights plus charging add 50Wh. A full 48-hour trip needs 1,100Wh at the loads. That exceeds the smaller model’s 783.36Wh budget by 316.64Wh. Under the assumed 85% delivery factor, about 372.52Wh must reach the battery during the trip to close that gap while retaining the chosen reserve.
The larger model has 466.72Wh left in the same planning budget after those 1,100Wh of loads. That makes it the stronger candidate for this particular two-day example without charging, provided the connection, condition and loading checks pass. It does not prove two days for an unspecified fridge in hot weather.
At 550Wh per day for three full days, loads need 1,650Wh. Even C2000 Gen 2 has an 83.28Wh shortfall under this convention. The small-looking gap still needs a supported recharge or a changed trip plan. Treating “about three days” as three guaranteed days would conceal it.
Test the assumptions before settling on a size
Change one assumption at a time. With a 10% reserve and a 75% delivery factor, C1000 Gen 2 has 691.2Wh at the loads; at 90% delivery it has 829.44Wh. At a 550Wh daily load, those values give about 30.2 and 36.2 hours. This is a sensitivity comparison, not a guaranteed runtime range.
A different starting charge also matters. An illustrative 80% starting level and 10% remaining reserve leave 70 percentage points of nominal energy available before applying the delivery assumption. At 85% delivery, the smaller model’s budget becomes 609.28Wh, not 783.36Wh. The same daily load now has about 26.6 calculated hours.
Use those differences to decide which uncertainty needs resolving. If the fridge measurement changes sharply with weather, collect a representative hotter-day observation. If the charging plan routinely leaves the Anker power station at 80%, plan from that actual starting condition. Buying capacity based on an assumed full battery will not correct a departure routine that supplies less energy.
3. Check whether your charging stops close the gap
A smaller station can work on a longer trip when charging reliably restores the required energy. A larger station can still fall behind when daily use exceeds replenishment. Write each charging opportunity as a source, permitted connection, likely input over time and the period when you can actually use it.
Separate input energy from energy later delivered to the fridge. An Anker power station receiving 200Wh at its input does not necessarily store 200Wh in the battery or later deliver 200Wh at the loads. Charging losses, simultaneous use and subsequent output losses all affect those boundaries.
Wall charging: verify the mode and available supply
The C1000 Gen 2 user guide specifies 1,200W maximum standard AC charging and 1,600W maximum UltraFast charging. UltraFast must be enabled in the app; unplugging the AC charging cable disables it, so the mode needs checking at the next stop. The guide recommends using UltraFast when necessary rather than assuming it stays active.
Anker advertises a 49-minute full recharge for this model. Its product FAQ says UltraFast charging activates above a battery-cell temperature of 20°C / 68°F and that charging in the 0–20°C range slows significantly. That makes the advertised time a manufacturer claim with conditions, not a dependable duration for every cold morning stop.
C2000 Gen 2 lists up to 1,800W AC charging on its US product page. Compare the supply and mode you will use rather than ranking the two models from their maximum figures alone. A shared campground outlet, a reduced-input setting or interruptions can change the usable window. Use the original approved cable and an authorized suitable supply.
The smaller model’s 372.52Wh battery shortfall in the two-day example would take about 2.1 hours at an assumed 200W input and 90% charging efficiency. At an assumed 800W input with the same efficiency, the arithmetic gives about 0.52 hours. Neither value is a measured charging time; tapering, temperature and concurrent loads can extend it.
This comparison identifies why the stop matters. A long low-power connection can close the same gap as a shorter higher-power connection, if it is supported and available. Record the actual input and duration during a representative trial before assigning the stop a guaranteed energy contribution.
Solar charging: capacity and panel watts answer different questions
The C1000 Gen 2 product specifications list an 11–28V band limited to 8.2A and a 29–60V band limited to 14.5A, with 600W maximum overall solar input. C2000 Gen 2 lists 11–60V, 17A maximum and 800W. These limits describe their inputs; they do not promise that a panel array will produce the maximum throughout a day.
At an assumed 20V operating point, 8.2A corresponds to 164W. That arithmetic explains why a 600W headline is not automatically available from a low-voltage arrangement. It is not approval for a particular panel, nor permission to raise array voltage without checking its full specifications and supported configuration.
The C1000 Gen 2 manual separately requires total panel open-circuit voltage within 60V and total short-circuit current within 15A, and recommends its documented parallel arrangement and compatible Anker equipment. Operating-point arithmetic cannot replace those limits. Use the series and parallel compatibility worksheet when evaluating an approved multi-panel arrangement.
For an energy example, assume an average 150W reaches the station’s input for three useful hours. That is 450Wh at the input. An assumed 90% charging factor leaves 405Wh stored; at the earlier 85% delivery factor, about 344.25Wh could later serve the loads. That would cover the 316.64Wh smaller-model shortfall in the two-day example under those assumptions.
If useful collection lasts only two hours, the same calculation gives 229.5Wh at the loads and leaves the example short. Shade, weather, available placement and the battery’s charging state determine whether the longer window exists. Choose the Anker power station and solar arrangement together, with a fallback for a missed collection period. If you will connect an Anker power station to mains and panels during the same stop, use the simultaneous AC and solar charging checks to confirm model support, source priority and energy retained while devices are running.
Vehicle charging: count the drive you will actually make
The C1000 Gen 2 manual supports charging from a car’s output port with a separately purchased car charging cable. Verify the vehicle socket’s rating, ignition behavior and the exact supported station cable. A car-output rating on the station describes powering a device; it is not the station’s guaranteed vehicle-input rate.
At an assumed 100W input for a two-hour drive and 90% charging efficiency, 180Wh reaches the battery. Applying the 85% later-delivery assumption gives 153Wh for loads. That helps the two-day smaller-model example but leaves 163.64Wh of its original load-side shortfall unresolved.
Replacing a full 550Wh day is a larger task. Under the same factors, it takes about 7.2 hours at that assumed 100W input. A short drive can bridge part of a trip gap while being insufficient for daily replenishment. The vehicle charging guide covers the vehicle-side checks and energy record.
An installed alternator charger is a separate equipment and installation choice. Do not carry a product’s maximum alternator-input headline into a cigarette-lighter calculation. Confirm approved station, vehicle and charger compatibility with the relevant manuals and a suitable installation plan before counting that source.
4. Make capacity fit the cargo and handling plan
C2000 Gen 2’s extra nominal energy comes with a larger unit. Its published 41.7lb weight is 16.8lb more than the C1000 Gen 2’s 24.9lb. Decide whether you can load, remove and carry the selected Anker power station as often as your charging plan requires.
Do not treat “portable” as a personal lifting assessment. Check the handles, height of the cargo floor, distance to the permitted charging location and whether another person is available. A station that is manageable beside the vehicle may be difficult to lift from a deep cargo position once the fridge and luggage are packed.
Measure the working space, including access
Use the Anker power station’s published dimensions as the beginning of a layout check. Add the clearance required by the manual for ventilation, plugs and access. Measure where the unit will sit with the fridge, sleep platform and actual luggage in place. A rectangular outline that fits does not prove the cooling vents stay open or the car-socket plug can be removed without unloading everything.
Plan cable routing so the fridge lead is not pinched by a door, pulled by shifting equipment or used as a restraint. Secure equipment using an appropriate vehicle and product arrangement. This article does not establish tie-down strength, crashworthiness or a tested fit in a RAV4, 4Runner or another SUV.
Temperature belongs in that working-space check. The C1000 Gen 2 page lists charging at 32 to 104°F / 0 to 40°C and discharging at -4 to 104°F / -20 to 40°C. The US C2000 Gen 2 user guide lists those same ranges for its charging and discharging operations. A permitted discharge temperature does not imply charging is permitted at that temperature. Keep the exact model’s limits with the plan.
Use the cold-weather station checklist when temperature changes the recharge plan. Keep the station within its own operating limits and ventilation requirements. A parked vehicle’s outside weather report does not establish the conditions around a battery inside the cargo area.
Expansion changes more than the capacity total
Anker’s C1000 Gen 2 FAQ says this generation does not support expansion. It directs users needing expansion to the original C1000. Do not buy an original C1000 expansion accessory expecting a similar name to establish Gen 2 compatibility.
C2000 Gen 2 supports the BP2000 Gen 2 expansion option. The product page lists that battery at 2,048Wh and 15.3kg. Adding it means another item, cable, space requirement and handling task. Confirm the exact accessory and documented arrangement, including placement and charging behavior, before comparing the total purchase cost.
A larger combined capacity may make an infrequent-recharge trip easier, but it does not change the fridge socket’s rating. Compare the whole package against a smaller station with a dependable charging stop. Keep accessory compatibility, total handling burden and the missed-stop budget in the same decision record.
5. Check the Anker power station before departure
Use the intended fridge, cable and Anker power station together while the return window and manufacturer support remain available. Follow the manuals’ controls and connection process. Record the station model, firmware, fridge settings, charging limits and connected devices so the comparison can be repeated.
Start with a normal cooling cycle, then observe several compressor-off and restart periods. The question is whether the fridge remains supplied when it needs cooling again. A battery percentage on the Anker power station’s screen does not by itself answer that question.
Keep screen, standby and output behavior separate
The C1000 Gen 2 manual describes a configurable screen timeout and a default 12-hour station standby duration that can be changed in the app. Screen-off behavior and station standby are different controls. Read the settings for your intended output and check their effect on a cycling fridge instead of treating the dark screen as proof of shutdown.
Record an overnight observation under the intended setup. Confirm the fridge restarts, note any alert and check the remaining energy against the budget. If an output stops unexpectedly, use the appropriate troubleshooting or manufacturer support route. Do not defeat protection settings or assume the original C1000 forum resolution applies to your Gen 2 unit.
Keep the Anker power station’s selected upper and lower charging limits with the trial. The C1000 Gen 2 guide allows an upper limit between 80% and 100% and a lower limit between 1% and 20%. Those settings can change the energy available for a trip. A plan calculated from 100% to 10% needs revising when the actual settings or starting condition differ.
Compare the planned recharge with what happened
Try the charging source you intend to use. Record input power over a useful period, duration, concurrent loads and the station’s charging state. A single peak input reading is not accumulated energy. If the manufacturer’s available data does not provide cumulative input, keep enough observations to distinguish a brief maximum from a sustained average.
For the two-day 550Wh-per-day example, the smaller unit needs 316.64Wh more at the loads under the stated budget. Compare your observed replenishment with that gap. If it does not close, choose more supported capacity, arrange another dependable stop or shorten the supported trip. Removing nonessential lighting can change the total, but it does not make an unresolved fridge requirement disappear.
Also calculate the trip with the least dependable stop removed. The larger model covers the illustrative two-day load from the starting battery under the assumed factors; the smaller model does not. For three days, neither base unit meets the same example without some adjustment. That is the decision your fallback record needs to preserve.
| Final decision field | What to keep |
|---|---|
| Exact products | US station generation, fridge model, approved cable and any accessory |
| Output compatibility | Fridge voltage/current/startup requirements and socket limit |
| Trip budget | Representative daily load, actual hours, starting level, reserve and loss convention |
| Recharge contribution | Supported source, observed conditions, duration and energy boundary |
| Handling | Working footprint, ventilation, access, loading and restraint plan |
| Departure check | Cooling-cycle and overnight result, firmware, limits and alerts |
| Missed-stop choice | Additional capacity, another verified source or a shorter supported trip |
Choose C1000 Gen 2 when that completed record supports the smaller package and its needed charging stops. Choose C2000 Gen 2 when the extra starting energy or approved expansion resolves the trip gap and the handling plan works. Keep the assumptions with your decision so a hotter fridge load, another device or a changed route prompts a new calculation.
If you are still choosing among brands, return to the 12V fridge station buying guide. The portable power station guide collection connects this model comparison with the separate capacity, charging and troubleshooting tasks.