A power station for a coffee maker needs normal AC output that meets the exact brewer’s electrical requirements and enough usable energy for your complete coffee routine. Check the brewer’s label first, then budget heating, brewing and any keep-warm time. A small pot or a single-cup machine can still need a substantial inverter even when one brew uses relatively few watt-hours.
These five checks help you turn the equipment you own into an output requirement and a coffee-session budget. The calculations are illustrative; they don’t report a Wild Smart Gear product test or promise a particular number of cups.
1. Choose a power station for a coffee maker from its input label
Find the brewer’s exact model, supply voltage, frequency and electrical input. Compare those requirements with the station’s normal continuous AC output, individual outlet limits and any shared-output limits. Keep the manufacturer’s instructions for both devices with the figures.
Cup count is a poor shortcut. For example, the US Moccamaster KBGV specification table lists 120V, 1475W and a 1.25-liter carafe. Those are specifications for that brewer, not a typical wattage assigned to every drip machine. They show why you should check a real label before buying a battery based on the brewer’s appearance.
A hypothetical station rated for 1000W continuous AC output doesn’t meet that 1475W input requirement in normal operation. Adding battery capacity won’t fix the output limit. Conversely, a station with adequate output can still run out of energy before you finish several mornings of coffee.
For a power station for a coffee maker, a short surge rating doesn’t provide several minutes of extra continuous output. Check the duration and conditions attached to any peak specification. Don’t apply a generic motor-start multiplier to a brewer or assume a boost mode supports its heater, pump and electronic controls. Obtain model-specific confirmation where the normal specifications leave a gap.
If only volts and amps are provided, their product describes apparent power in volt-amperes on AC; it isn’t necessarily a measured real-watt value. Check both current and watt limits, and ask the manufacturer for the missing input information. Our guide to watts and watt-hours explains the ratings you’ll use in the later energy budget.
| Check | Evidence to keep | Why it changes the decision |
|---|---|---|
| Brewer input | Exact label and regional manual | Establishes the required supply |
| Normal station output | Continuous watts, outlet current and shared limits | Determines whether brewing is supported |
| Operating mode | Manufacturer-supported normal or special mode | A marketing peak doesn’t establish compatibility |
| Connection and placement | Permitted supply, cables and location | A matching plug alone is insufficient |
| Other active equipment | Simultaneous running and startup requirements | The brewer shares the source’s limits |
Keep essential equipment on its own appropriate continuity plan. If another load can safely wait, schedule it outside the brewing window. Don’t assume the full station rating is available to each socket simultaneously.
2. Measure a complete session on the power station for a coffee maker
Measure from the start of the routine to its actual end. For a drip brewer, that can include heating, filling the carafe and leaving the warmer on. For a pod machine, include initial heat-up and every cup you intend to make. Espresso preparation may also include flushing, steam use and a grinder. The routine determines the measurement window.
The KBGV description specifies a hotplate with an independent heating element, and its product table lists automatic power-off at 100 minutes. Neither fact gives its measured energy per pot. Automatic shutoff also doesn’t mean the warmer consumes no energy before it switches off.
Where both manuals permit the arrangement, use a suitable plug-in energy meter rated for the actual supply and load. Record cumulative Wh or kWh before and after the complete routine. Convert kWh to Wh by multiplying by 1000. Don’t improvise an extension, adapter or measurement connection prohibited by either device’s instructions.
A meter at the station’s AC outlet, upstream of the brewer, measures energy delivered to the brewer. It doesn’t include the station’s internal conversion and operating losses. A battery-side energy record has a different boundary. Write down where the reading came from so you can compare it with the available-energy figure later.
Include the second brew you actually make
A cold first brew and a second brew soon afterward may have different energy requirements. Measure the complete repeated routine rather than multiplying a single cup’s result blindly. Keep water volume, starting conditions and the machine’s settings with the record.
Compare coffee routines on the same boundary
Suppose a hypothetical meter record shows 90Wh for the first brew, another 35Wh for a second brew and 20Wh for the intervening warmer period. The two-brew routine uses 145Wh at that meter. Two isolated cold-start records of 90Wh would total 180Wh, but they describe a different routine. You cannot assume either result applies to the other without trying it. These readings illustrate record keeping rather than a tested brewer.
For a useful comparison, retain the amount of coffee produced. A result for two small cups is not an equivalent alternative to a full carafe unless that smaller quantity meets your need. Record the water you actually use, rather than relying on the word “cup,” which can describe different serving volumes. If you compare machines, carry the same needed beverage quantity and after-brew use into each record.
Keep a grinder on its own row if it has a separate supply. Its energy may be a small part of a morning, while simultaneous operation can still matter to the output limit. For example, an assumed 200W grinder operated for 30 seconds uses about 1.7Wh. That calculation says nothing about its startup demand or actual specification. Its input must still fit when the brewer is heating, or it must be scheduled separately where the documented arrangement permits.
If the station only reports battery percentage, retain that observation with the full routine and battery state. A drop from 90% to 80% in one short trial does not prove that ten identical sessions will run from a full charge. Display resolution, battery condition and changing operation limit that extrapolation. Use a complete supported trial and cumulative energy information where available rather than assigning precision the screen does not provide.
You can compare two routines on the same equipment: brew and switch off according to the manual, or brew and leave the warmer on for your usual period. That comparison answers a practical question about your own habit. It doesn’t require inventing a typical keep-warm wattage for every machine.
When checking a power station for a coffee maker, record the highest displayed operating demand as well as cumulative energy. A slowly updating display can miss a brief event, so an unexplained trip still needs manufacturer guidance. Average watts over the whole morning cannot establish that the source supports each heating period.
| Session record | What to note |
|---|---|
| Equipment | Brewer, grinder and station models; regional supply |
| Preparation | Water quantity, starting condition, cups or carafes |
| Routine | Initial heat, brewing, steam or flushing, warmer duration |
| Energy | Start/end cumulative reading and measurement point |
| Behavior | Highest observed demand, warnings and interruptions |
| Repeat use | Second brew and other loads running at the same time |
3. Budget brews and keep-warm energy separately
For a constant electrical load, energy is watts multiplied by hours. For distinct phases, add each phase’s energy. A measured cumulative reading is usually more useful when the heater cycles; multiplying the rated input by the entire clock time can misrepresent the routine.
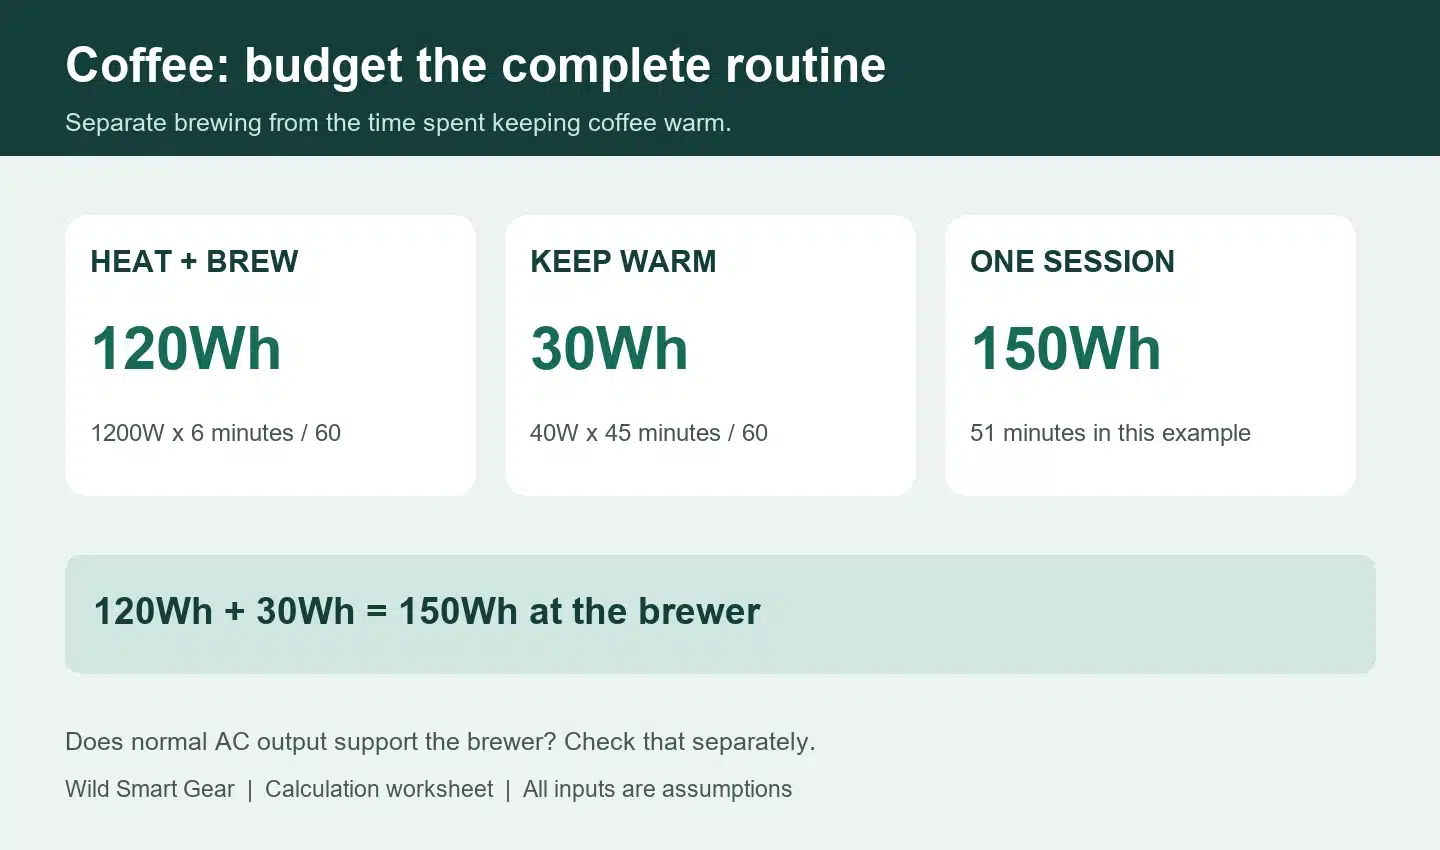
Consider this hypothetical coffee session. These figures are invented calculation inputs, not KBGV measurements or a description of its actual heater behavior.
| Assumed phase | Average input | Duration | Energy at the brewer |
|---|---|---|---|
| Heating and brewing | 1200W | 6 minutes | 120Wh |
| Keeping the carafe warm | 40W | 45 minutes | 30Wh |
| Complete session | — | 51 minutes | 150Wh |
The arithmetic is 1200 × 6 ÷ 60 + 40 × 45 ÷ 60 = 150Wh. The six-minute phase is treated as constant average input for this example. Replace it with your own cumulative observation when the appliance’s actual operation differs.
Start with the energy you can spend on coffee
Suppose you have 800Wh of usable AC energy for the relevant period. You hold 200Wh in reserve and assign 300Wh to other loads. Coffee gets the remaining 300Wh:
800 − 200 − 300 = 300Wh available for coffee
At the hypothetical 150Wh per complete session, two sessions fit exactly. That leaves no slack within the coffee allocation if the measured routine takes longer. Three sessions would need 450Wh and exceed it. Rounding down the session count is useful; a partial energy allowance doesn’t guarantee a completed pot.
This example begins with usable AC energy, so you subtract AC-side session energy directly. Applying another conversion percentage would count the same losses again. If instead you start with nominal battery capacity, use a clearly stated assumption about how much reaches the AC loads. At an illustrative 80% available-energy fraction, 150Wh at the brewer corresponds to 187.5Wh nominal before a separate reserve. That 80% isn’t a verified efficiency for your station.
Leave time between brews in the budget too. If the station’s AC output stays enabled, its own overhead may continue even with the brewer off. Count that operating pattern once, at the appropriate measurement boundary. A brief load test may not represent an inverter left active for a whole day.
Replenish the power station for a coffee maker before the next morning
For three mornings, the assumed 150Wh session needs 450Wh delivered to the brewer. A 300Wh coffee allocation is therefore short by 150Wh unless the routine changes or enough energy is replenished before the third use. Charging late on the third afternoon cannot support coffee already needed that morning.
Consider a different hypothetical charging record: a supported source averages 100W into the station for one hour. That is 100Wh at its input. If you assume a 90% charging factor and 80% later AC delivery, it restores 72Wh for the AC loads: 100 × 0.90 × 0.80. Those assumed factors describe two different stages. They are not a measured refill or a guaranteed result for a charger.
Under those inputs, the stop does not replace a 150Wh session. Extending it to two hours at the same average input would restore 144Wh, still slightly less. Actual accepted input can change with battery state and charging conditions, so keep the observed energy and timing with the ledger instead of extending a momentary peak reading.
If you already measured replenishment as additional usable AC energy under the relevant conditions, add that result directly; don’t apply the two factors again. The power station for a coffee maker budget should use one consistent accounting method from available energy through complete sessions. Mark planned charging separately from completed charging so a missed stop remains visible.
Put the coffee allocation into your household backup load worksheet when refrigeration, lights or communications share the battery. A power station for a coffee maker should be selected from the complete shared plan when it serves those other jobs as well.
4. Change the coffee routine where it helps
The useful change depends on the failed check. If normal output is inadequate, trimming keep-warm time won’t make the heating stage compatible. Choose a brewer with verified lower electrical input, an adequate supported power source or a different preparation method.
If output is adequate but the energy budget is tight, compare complete routines. Switching off the warmer when the brewing instructions permit it can remove that later load. An insulated serving container may keep coffee available without continued electrical warming; follow the brewer’s procedure and use suitable containers for hot liquids.
When comparing a thermal-carafe brewer with a glass-carafe machine, check each exact input specification and complete serving routine. An insulated carafe changes how coffee is held after brewing; it doesn’t establish a lower heating-stage input by itself. Likewise, a smaller advertised serving capacity may reduce the quantity heated without making the station’s required continuous output smaller. Keep output compatibility and session energy as separate comparison columns.
In the hypothetical table above, omitting the 45-minute warming phase reduces session energy from 150Wh to 120Wh. That is a 30Wh difference in this example, not a savings guarantee for a product. With a 300Wh coffee allocation, two 120Wh sessions leave 60Wh of slack; three still don’t fit.
A power station for a coffee maker also needs to cover the routine you enjoy. Two pod cups, milk steaming and a grinder can change the energy and simultaneous load. Don’t choose a battery around one plain espresso if your usual preparation includes several additional tasks.
Use the machine’s documented modes and water-temperature instructions. Don’t pour preheated water into a reservoir unless the manufacturer permits it, and don’t lower voltage or bypass controls to force a high-input brewer onto an unsuitable source.
For manual pour-over or another method needing separately heated water, use the electric-kettle compatibility and boil-energy guide. That changes the electrical appliance you need to support. A low-wattage kettle still requires a measured hot-water budget, and a hand-operated coffee device doesn’t make heating energy disappear.
5. Try the planned routine before relying on it
Verify a power station for a coffee maker with the exact brewer, supported connection and normal routine while another appropriate source remains available. Use the planned battery state, permitted environment and intended shared loads. Keep the station clear of spills, steam and heat, and preserve both devices’ ventilation and location requirements.
Check the first heat-up, complete brewing, intended warmer period and any second brew. Record whether the coffee task completed and whether either device showed a warning or reset. A successful short heating start doesn’t establish enough energy for the rest of the morning.
Check automatic-output behavior during any long idle period as well. If an output stops after normal operation, the low-load shutdown checklist helps separate a documented timer from a fault. Keep reset steps with the exact manual rather than repeatedly restarting an unexplained pairing.
For several mornings without charging, allocate each complete session. If charging is planned, count replenishment only when a supported source is available and enough energy is restored before the next use. The charger’s maximum input rating alone doesn’t establish that a short stop replaces the previous morning’s energy.
| Result | Next decision |
|---|---|
| Input and connection pass; complete sessions fit | Keep the equipment and session record together |
| Heating exceeds normal output | Change the brewer or supported power source |
| Output passes; session energy exceeds the allocation | Adjust the routine, capacity or dependable recharge |
| The brewer resets or the station faults | Record the conditions and obtain model-specific guidance |
| Supply, grounding or location is unresolved | Resolve the permitted arrangement before using it |
Before buying a power station for a coffee maker, keep four things together: the exact input requirement, permitted connection, observed complete-session energy and available coffee allocation. Those figures tell you whether the brewer fits your plan and which change would solve a shortfall.